
Mirro pressure canning offers a safe and effective method for preserving foods‚ particularly low-acid items. Legacy models require specific manual adherence‚ while newer canners have updated guidelines.
Understanding your Mirro canner‚ whether legacy or recent‚ is crucial for successful and safe home food preservation. Always consult the correct manual for your model.
What is Pressure Canning?
Pressure canning is a method of preserving food by heating it to a high temperature – 240°F (116°C) – inside a sealed pressure canner. This temperature is significantly higher than boiling water‚ making it essential for safely canning low-acid foods like vegetables‚ meats‚ and poultry.
Unlike water bath canning‚ which relies on boiling water to create a vacuum seal‚ pressure canning achieves sterilization through pressurized steam. This process destroys Clostridium botulinum spores‚ the bacteria responsible for botulism‚ a potentially fatal form of food poisoning.
Mirro pressure canners utilize this principle‚ creating a controlled‚ high-pressure environment. Proper operation‚ following the manufacturer’s instructions (especially differentiating between legacy and newer models)‚ is paramount for safety and successful preservation. Ignoring guidelines can lead to spoilage or‚ more seriously‚ health risks.
Why Choose a Mirro Pressure Canner?
Mirro pressure canners have a long-standing reputation for durability and reliability in home canning. Historically‚ they were a popular choice‚ and many legacy models are still in use today‚ supported by extensive online resources and community knowledge.
Choosing a Mirro canner offers a cost-effective entry point into pressure canning‚ particularly when considering used legacy models. However‚ it’s crucial to identify the model year‚ as newer canners (post-2016/2017) have significant operational differences and require distinct instructions.
The brand’s widespread availability also means ample access to manuals‚ recipe booklets‚ and support groups like “Canning for beginners‚ safely by the book” on Facebook. This community support is invaluable for new canners navigating the process.

Understanding Your Mirro Pressure Canner
Mirro canners vary significantly between legacy and newer models; identifying yours is key. Familiarize yourself with all components and prioritize safety features for successful canning.
Mirro Canner Models: Legacy vs. Newer
Mirro pressure canners have evolved over time‚ resulting in distinct legacy and newer models. Legacy canners‚ often older designs‚ require strict adherence to their original instruction manuals. These manuals are crucial‚ as safety features and operating procedures differ significantly from modern counterparts.
Newer Mirro canners‚ generally those purchased from 2016 or 2017 onwards‚ incorporate updated safety mechanisms and may have simplified operation. Disregarding older manuals is essential when using a newer model‚ as following legacy instructions could compromise safety or processing effectiveness. Identifying your model year is the first step; newer models often lack the detailed‚ sometimes complex‚ instructions found in legacy versions; Resources specifically tailored to newer Mirro canners are readily available online.
Key Components of a Mirro Pressure Canner
A Mirro pressure canner comprises several key components working in unison. The main body‚ typically aluminum‚ houses the canning rack and provides space for jars. The lid is crucial‚ featuring a rubber gasket to create an airtight seal‚ essential for achieving necessary pressure.
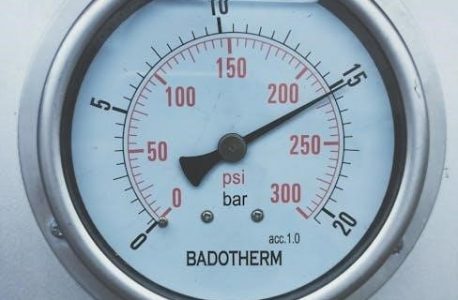
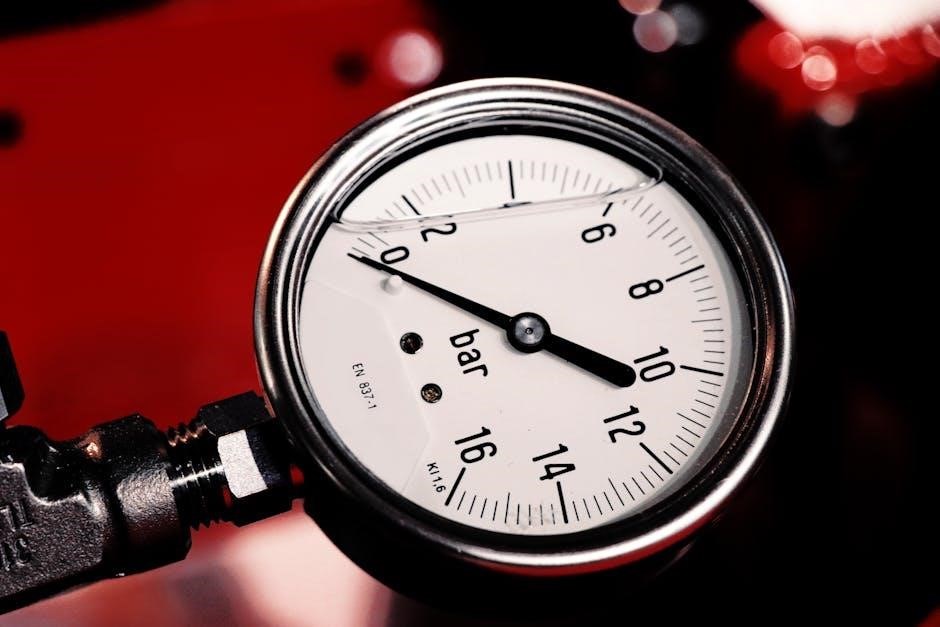
Pressure regulators – weights or dial gauges – control and maintain the correct pressure during processing. A vent pipe‚ or petcock‚ releases air during venting. Understanding each component’s function is vital for safe operation. Regularly inspecting the gasket for cracks or damage‚ and verifying the accuracy of the pressure regulator‚ ensures optimal performance and prevents potential hazards. Proper assembly of these parts is paramount before each canning session.
Safety Features and Their Importance
Mirro pressure canners incorporate several safety features critical for preventing accidents. The vent pipe‚ or petcock‚ allows for proper venting‚ releasing air before pressurization – a vital step to avoid pressure buildup. Overpressure release mechanisms‚ like safety valves‚ prevent dangerous pressure levels.
A secure locking mechanism ensures the lid remains firmly sealed during processing. Regularly inspecting these features is paramount. A damaged gasket or malfunctioning regulator can compromise safety. Always follow manufacturer instructions precisely‚ especially regarding venting and pressure monitoring. Ignoring these safeguards can lead to burns‚ jar breakage‚ or food spoilage. Prioritizing safety ensures successful and worry-free canning.

Preparing for Canning
Proper preparation is key! Sterilize jars‚ inspect for cracks‚ and carefully follow food preparation guidelines‚ ensuring accurate headspace for safe‚ successful canning.

Jar Preparation: Sterilization and Inspection
Before beginning‚ thoroughly wash jars in hot‚ soapy water‚ then rinse. Sterilization is vital; place clean jars in boiling water for 10 minutes at altitudes under 1‚000 feet‚ adding one minute for each additional 1‚000 feet. Keep jars hot until filling.
Crucially‚ inspect each jar for cracks‚ chips‚ or any damage‚ especially around the rim. Even minor imperfections can prevent a proper seal‚ leading to spoilage. Discard any damaged jars immediately. Use only canning jars designed for pressure canning – mayonnaise or other repurposed jars are not suitable due to potential breakage under pressure.
Ensure the rims are free of nicks. A properly prepared jar is fundamental to safe and effective preservation with your Mirro canner.
Food Preparation Guidelines
Proper food preparation is paramount for safe canning. Always follow tested recipes from reliable sources – the National Center for Home Food Preservation is an excellent resource. Raw foods must be prepared according to recipe instructions‚ often involving washing‚ peeling‚ chopping‚ or pre-cooking.

For low-acid foods like vegetables and meats‚ precise adherence to recipe guidelines is critical to eliminate botulism risks. Do not alter ingredient proportions or processing times. Pack food into jars‚ leaving the recommended headspace (see next section).
Remove air bubbles by gently running a non-metallic spatula around the inside of the jar. Wipe jar rims clean before applying lids and rings‚ ensuring a proper seal during processing with your Mirro canner.
Proper Headspace Measurement
Headspace‚ the empty space between the food and the lid within the jar‚ is vital for creating a vacuum seal during processing. Recommended headspace varies depending on the food being canned; typically‚ it ranges from ¼ inch for liquids to 1 to 1 ½ inches for solids.
Accurate measurement is crucial. Use a headspace tool or ruler to ensure consistent spacing. Insufficient headspace can cause jar breakage or seal failure‚ while excessive headspace may prevent proper sealing.
For your Mirro canner to function safely and effectively‚ always adhere to the headspace guidelines specified in your chosen recipe. Consistent headspace contributes to reliable preservation and food safety.

The Canning Process
Proper canning with a Mirro requires careful loading‚ venting‚ pressurizing‚ and processing according to tested recipes and your canner’s manual for safe results.
Loading the Canner
Begin by placing the canning rack inside your Mirro pressure canner. Add the appropriate amount of water‚ typically 2-3 inches‚ as specified in your manual – crucial for generating steam. Carefully load filled jars onto the rack‚ ensuring they don’t touch each other or the canner walls.
Spacing allows for proper heat circulation. Secure the lid‚ aligning it correctly‚ and lock it into place. Double-check the sealing ring is properly seated to prevent leaks. Remember‚ proper jar preparation and headspace are vital before loading.
Always refer to your specific Mirro model’s instructions‚ as loading capacities can vary. Overloading can compromise processing safety‚ while underloading may affect pressure maintenance.
Venting the Canner
Venting is a critical step to remove air from the canner before pressurizing. After securing the lid‚ turn the heat to high. A steady stream of steam will emerge from the vent pipe – this is air being purged.
Continue venting for precisely 10 minutes. This ensures all air is replaced with steam‚ vital for accurate temperature and pressure readings. A consistent‚ robust steam flow indicates proper venting.
After the 10-minute vent‚ place the weight on the vent pipe‚ or close the petcock‚ depending on your Mirro model. This traps the steam‚ allowing pressure to build. Failure to vent adequately can lead to under-processing and unsafe food.
Pressurizing and Processing Times
Once the weight is on‚ or the petcock closed‚ pressure will begin to build. Monitor the pressure gauge closely. Adjust the heat to maintain the correct pressure specified in your recipe – typically 10 or 15 PSI‚ depending on altitude and food type.
Processing time begins only when the correct pressure is reached. Maintain a consistent pressure throughout the entire processing time. Fluctuations can compromise safety. Refer to tested recipes for accurate processing times based on jar size and food content.
Precise timing is crucial. Under-processing can lead to spoilage‚ while over-processing can affect food texture. Use a timer and record the start and end times for accurate tracking.

Troubleshooting Common Issues
Common problems include failure to pressurize‚ pressure fluctuations‚ and difficulty cooling. Always consult your manual and ensure proper sealing and venting techniques are followed.
Addressing these issues promptly and correctly is vital for safe canning practices with your Mirro pressure canner.
Canner Won’t Pressurize
If your Mirro pressure canner fails to reach the required pressure‚ several factors could be at play. First‚ verify sufficient liquid is inside – typically‚ 2-3 inches for most recipes. Insufficient liquid prevents steam buildup‚ essential for pressurization.
Next‚ meticulously inspect the sealing ring for cracks‚ nicks‚ or improper seating. A compromised seal allows steam to escape‚ hindering pressure development. Ensure the lid is correctly aligned and securely locked in place‚ following the manual’s instructions precisely.
Also‚ check the vent pipe/steam vent for obstructions. Food particles or debris can block the vent‚ preventing proper pressure regulation. Finally‚ for older models‚ confirm the weight is correctly positioned. Refer to your specific manual for detailed troubleshooting steps‚ as legacy and newer models differ.
Pressure Fluctuations During Canning
Minor pressure fluctuations are normal during the canning process‚ but significant or continuous variations require attention. Initially‚ venting the canner properly is crucial; ensure a steady stream of steam escapes for the recommended time (usually 10 minutes) before adding the weight or closing the vent.
Fluctuations can occur due to variations in heat source intensity. Adjust the burner setting to maintain a consistent pressure throughout the processing time. Avoid excessively high heat‚ which can cause rapid pressure increases and potential hazards.
For older Mirro models‚ ensure the weight fits snugly and moves freely. Newer models may have different pressure regulation mechanisms; consult your manual. If fluctuations persist‚ carefully monitor the canner and consider reducing the heat slightly. Consistent monitoring is key to safe canning.
Cooling and Depressurizing the Canner
Allow the canner to cool naturally after the processing time is complete. Do not attempt to speed up the cooling process by running cold water over the canner; this can cause jar breakage and food spoilage. Removing the weight or opening the vent prematurely can lead to sudden pressure drops.
Once the pressure gauge returns to zero‚ and after allowing an additional 10-15 minutes for complete depressurization‚ carefully remove the weight or open the vent. Slowly release any remaining pressure. Always point the vent away from you to avoid steam burns.
After depressurization‚ carefully open the lid‚ tilting it away from your face to avoid escaping steam. Inspect the jars to ensure they have sealed properly before storing them. Proper cooling and depressurization are vital for safety.

Operational Changes in Newer Models
Newer Mirro canners (post-2016/2017) differ significantly from legacy models; disregard older manuals. Updated safety features and guidelines are essential for proper operation.
Consult resources specifically designed for your newer Mirro canner to ensure safe and effective food preservation practices.
Differences from Legacy Models
Significant changes distinguish newer Mirro pressure canners from older‚ legacy models. The most crucial difference lies in the instruction manuals; those designed for older canners must not be used with newer equipment. Newer models often feature simplified operation and enhanced safety mechanisms‚ rendering older instructions inaccurate and potentially dangerous.
Legacy canners frequently relied on weighted gauges‚ requiring careful observation and adjustment. Newer models may incorporate dial gauges or automatic pressure control systems‚ streamlining the pressurization and maintenance process. These advancements necessitate a shift in understanding the canning procedure. Furthermore‚ updated guidelines regarding processing times and safety protocols are implemented in newer models‚ reflecting current food preservation best practices.
Always prioritize using the manual specifically provided with your newer Mirro canner to ensure safe and successful canning.
Updated Safety Guidelines
Modern Mirro pressure canning emphasizes rigorous safety protocols. Always verify the gasket’s condition before each use‚ ensuring it’s pliable and free from cracks or damage. Proper venting remains critical; allow a steady stream of steam to escape for the manufacturer-recommended duration before adding the weight or closing the vent.
Dial gauge accuracy should be checked annually‚ while weighted gauges require no routine calibration. Never attempt to open the canner until it has fully cooled and the pressure has returned to zero. Updated guidelines stress the importance of following tested recipes precisely‚ particularly regarding processing times and pressures‚ to prevent botulism.
Ignoring these updated safety measures can compromise food safety. Refer to current USDA recommendations and your canner’s manual for the most accurate and reliable information.
Resources for Newer Mirro Canners
For owners of newer Mirro pressure canners (post-2016/2017)‚ relying on legacy manuals is strongly discouraged due to significant design and safety feature updates. The National Center for Home Food Preservation (NCHFP) website provides extensively researched‚ science-based canning guidelines and recipes suitable for modern equipment.
Healthy Canning‚ in partnership with Facebook groups like “Canning for beginners‚ safely by the book‚” offers a valuable online community and updated information specific to current Mirro models. ManualsLib hosts downloadable instruction manuals and recipe booklets for various Mirro canner models‚ aiding in understanding specific features.
Always prioritize resources that align with current USDA recommendations and your canner’s model year to ensure safe and effective food preservation practices.